FAQ
Frequently Asked Questions
TeamViewer Support
Need hands on help?
Simply download TeamViewer using the link below and open the program. You will be assigned an ID and password, which you will then provide to our staff.
TeamViewer SupportTop Asked
If you are using POSTrack 4.07J with Windows 10, the SMB 1.0 protocol must be enabled, otherwise you may encounter errors when importing a new flight plan.
To enable the SMB 1.0 protocol in Windows 10:
- Open
Control Panel - Navigate to
ProgramsorPrograms and Features - Click on
Turn Windows features on or off - Scroll down to
SMB 1.0/CIFS File Sharing Support - Click on the tick box on the left hand side, all three SMB features should have check marks next to them. Click
OK.
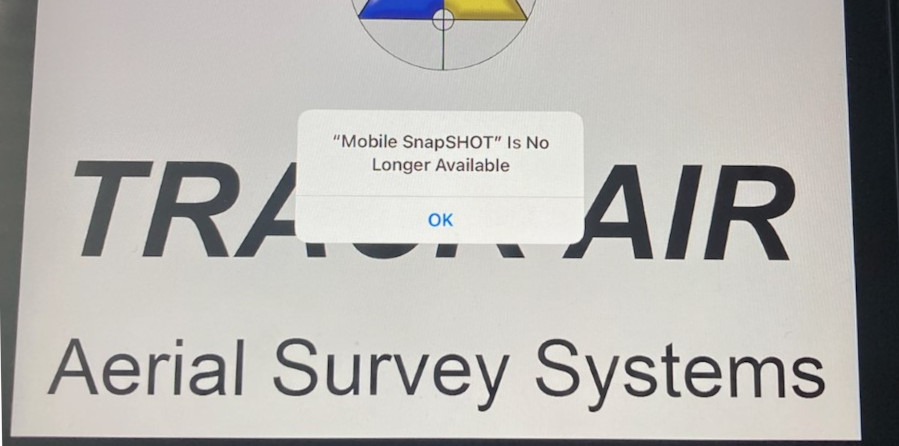
If you are operating on Mobile SnapSHOT 1.7.8 or earlier, there is a known issue in which SnapSHOT will display the following error on launch: "Mobile SnapSHOT" is no longer available." To resolve this issue, follow the steps below.
Download the pilot display app from the App Store to the iPad
- Open Settings app on the iPad, tap Wi-Fi and select a Wi-Fi with an Internet connection
- Open Safari and tap + icon on the upper right corner of the display
- Enter the following in the textbox near the top https://trackair.us/mobile
- Tap the Apple logo on the right to go to the App Store
- Sign in with an Apple ID account and password to download the pilot display app
- If you do not have an Apple ID account, create one HERE →
- Tap
Installthen tapDone - Tap
Always Requirewhen prompted: Require password for additional purchases on this device. - Wait for the app to finish installing
- Tap
OPENto verify if the app is installed - Press the Home button to go back to the Home Screen
Remove the Apple ID and forget the Wi-Fi Network with Internet
- Open Settings app
- Tap User Account near the top
- Scroll to the bottom on the right side and tap
Sign Out - Tap Wi-Fi on the left side
- Tap the circled i next to the Wi-Fi with Internet on the right
- Tap
Forget This Network - Tap
Forgetwhen prompted - Select the wi-fi used by snapSHOT
- Double press the home button and swipe all apps up to close them
Open a flight plan on the iPad
- Open snapSHOT and open a flight plan
- Tap Mobile snapSHOT icon on the dock near the bottom of the display to load the flight plan opened in snapSHOT
- You now can use the pilot display on iPad.
You will need the following:
- A laptop running Windows, with an Ethernet port and wireless capabilities.
- An Ethernet cable.
- A reliable internet connection.
Track’Air can remotely access most systems when they are connected to the internet. This way we can see what the user sees and often come to a quicker resolution when addressing any issue. We can do this by accessing an on-site laptop and then connecting through that computer to the Track’Air product.
- Connect the laptop to the internet wirelessly.
- Connect the Ethernet port to the Track’Air system in need of support.
- Once online go here: TeamViewer Support
- Download TeamViewer (32 or 64 bit depending on your system) and run the program. Follow the prompts. A TeamViewer window will open with an ID and Password.
- Under the Right side tabs, press on Remote Control.
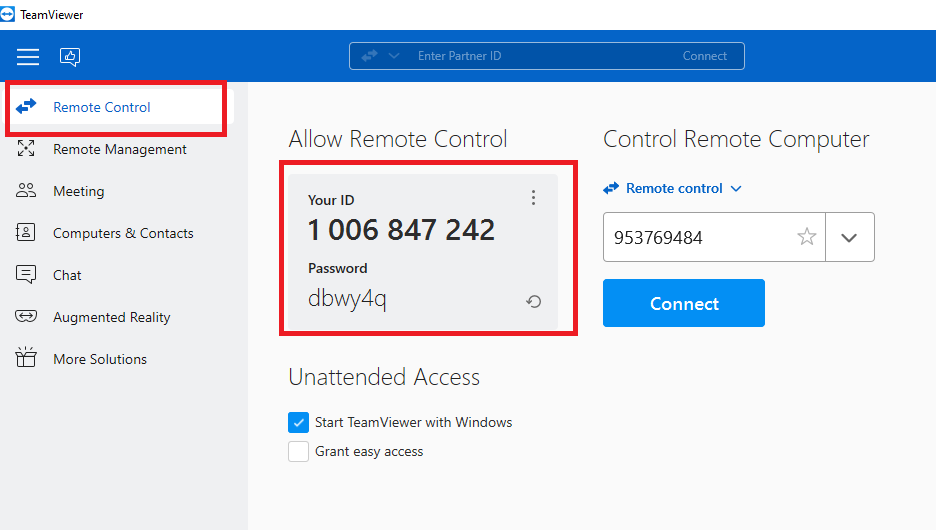
- E-Mail or call your Track’Air point of contact, be ready to provide the Teamviewer values for "Your ID" and "Password."
Last Updated: 2020 November 20
If your previously working Google Earth experiences an issue
connecting to the server, please see the following manual on
installing Google Earth v7.3.2 and stopping Google Earth from
updating to a later version that is not compatible with
snapVIEW.
Google Earth v7.3.2 Manual
To use the Google Earth Pro with snapVIEW, follow these steps:
- Open the Google Earth Pro manually and zoom to the area you would like to capture.
- Open snapVIEW, in snapVIEW main menu, click
the
Google Earth (V3)tab and then click2) Capture selected view in Google Earth.
NOTE:
- If Google Earth Pro has not been opened, the 1) Start / Show Google Earth button will bring up the older non-pro version.
- Google Earth Display does not work with the 64bit version of Google Earth, please download the 32bit version of Google Earth, which can be found below.
If you are having an issue with a pop-up window that requires you to change your terrain exaggeration we suggest you contact support for an updated software version. Please note that software updates require that you are up to date with your yearly maintenance fees.
PRE-INSTALLATION
- Be sure that you are logged in as a Windows Administrator.
- Be sure to disable remote software (e.g Teamviewer).
- Be sure to temporarily disable all anti-virus software.*
- Be sure that the destination drive is not full.
INSTALLATION
The software should be
installed by first right clicking on the installation package
and choosing to
Run as Administrator
. Subsequently run all Track’Air programs as administrator.
Obtain the installation zip file. The password to unzip the zip
file is your license ID. Unzip the installation and put the file
into a temporary folder on the C or D drive, do not run
from directly from the desktop. Then right click and
run as administrator
.
Force the application to run as Administrator:
- Login as a user with local administrative privileges.
- Right-Click on the application shortcut and select
Properties. - In the
Propertieswindow, click on theCompatibilitytab. - Check
Run this program in compatability mode for:and chose your operating system, orWindows 8if you are running Windows 10. - Check
Run this program as an administrator. - Click
apply, and then clickOK.
WINDOWS 8 / 10 SPECIFIC
Some Windows 8 and 10 installations don’t actually shut the
computer down when you press the
Shut down
button. You will need to go under
Power Options
in the Control Panel and select
Change what the power buttons do
and uncheck
Turn on fast startup
and select
Shut down
when the power button is pressed.
SnapShot and SnapPlan do not work properly unless the following setting is set to 100%, this issue also applies to the MS Surface tablet.
To address display setting issues navigate to the:
Control Panel
>
Display Settings
>
Change the size of text, apps, and other items
and set the value to 100%.
This issue appears to be related to the Window 10 User Account
Control (UAC) settings.
One possible solution to go to the command prompt and enter
net use x:
Where
x
is the drive letter to be mapped.
An alternate solution is: if you mapped the network drive and select all permissions allowed, except Full Control and Special Permissions, this may allow you to access the drives.
SnapShot goes mobile!
You can now run SnapShot on Android™ and Apple devices.
Android - Installation Instructions
LATEST RELEASE: 2018 February 16 – v1.6.1n
SnapSHOT v1.6.1nUPDATE LOG
Functionality
- Zoom to both airplane and flight plan when the zoom button with an airplane is pressed.
- Support for PSU flight plans in overview and trackup view.
Fixes
- Resolve disappearance of photo triggers that happens when aborting a run without triggering the cameras.
- More responsive manual run sequence and run adjust.
- Reduced memory usage for large flight plans.
- Removed the flashing of texts when the pilot display loses wireless connection.
- More consistent airspace display after exiting out the trackup view.
- All airspaces are now shown, not just the ones near the airplane.
iOS - Installation Instructions
LATEST RELEASE: 2020 May 1 – v1.7.1
iOS Mobile Snapshot v1.7.1What's New
- Support the newer generation iPad Mini 5.
- Display the trackup background when in a trackup view of a selected run.
- Higher airplane position in a trackup view to allow the user to confirm a photo trigger below the airplane.
- Lead line and lead dot for a selected run in overview.
- Alternating airplane color in between triggers in scanner mode.
Fixes
- New distance markers that are not prone to disappear when approaching a selected run.
- Better default panels selection and default panel positions for iPad Mini display.
- Resolved unmovable GALT panel.
*Android and Apple logos are registered trademarks of both Google and Apple respectively.
General
The time difference between GPS and UTC is adjusted every 1 – 6 years. The last adjustment took place on 2016 December 31. GPS is now ahead of UTC by 18 seconds. Further information regarding Trimble receivers and POSpac processing can be found here:
To adjust your offset in snapSHOT, navigate the menu system:
- 4-Config
- 6-SnapSHOT configuration
- 1-Times configuration
In the following sanpSHOT Configuration window adjust
the Difference between UTC and GPS times
value to +18 seconds and click
Apply
.
Lead'Air General Purpose FTP
WARNING: For official company use only. Files uploaded to the FTP server are available to the public for transfer. If you have any files with sensitive information, please remember to back up your file locally and delete it from the FTP server.
Setting up an FTP Client (FileZilla)
Downloading
To access the Lead'Air FTP server, you will need to download and install an FTP client. For the purposes of this guide, we will use FileZilla.
Download FileZilla HereIf prompted to select your version, select the left-most option: "FileZilla."
Installation
Once your download is completed, launch the FileZilla setup application.
- Agree to the FileZilla License Agreement.
- Decline all optional offers.
- Choose to make FileZilla available for use to all users or just yourself and click Next >.
- Do not make changes to Choose Components, or Install location and click Next >.
- Finally, click Install.
Configuration
Upon successful installation of FileZilla, launch the application from your desktop or the Windows start / application menu.
With FileZilla opened, you will see sectioned windows. On the left-hand side is the label: Local Site. This is your computer. The right-hand side is labeled: Remote Site. This where you will find and transfer files to the Lead'Air FTP.
Configuration (Continued)
- Use the key combination
CTRL+Sto open the Site Management window. - On the bottom left-hand side click New site, and use the name "LeadAir-FTP."
- On the right-hand side, under the General Tab,
use the following settings shown below:
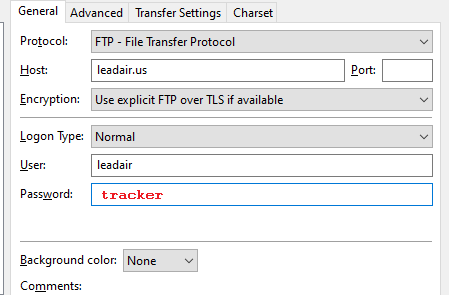
- Once configured, click connect, and you will be brought back to the main divided FileZilla window. Dragging and dropping files to the Remote Site section will copy them over to the Lead'Air FTP server from your local computer.
- Locate the directory of the Tracker32 Start Menu programs
shortcut. The default address in Windows 10 is:
C:\ProgramData\Microsoft\Windows\Start
                                        Menu \Programs\Tracker32
. - Right click on the taskbar.
- Choose
Toolbars. - Click on
New Toolbar. - Paste the above address into
Folder:. - Click on
Select Folder.
On TECI4 and Nanotrack the USB to serial port used is an FTDI device, which by default, Windows has a value of latency timer value of 16. For better performance change this to 1. In snapShot version 4.04t and above this is forced to 1 automatically. An older version may need to be manually adjusted by doing the following:
- In Device Manager, right-click on
COM portand select properties. - In the USB Properties window, click the tab
Port Settings. - Click the button that says
Advanced. - In the Advanced Settings window, change the latency timer to
1. - Click OK and then close Device Manager.
SnapVIEW offers integrated connectivity with Bing Maps, and allows you to capture desired images for flight planning.
The BING Maps tool requires that Microsoft Silverlight be installed on the computer.
Download Microsoft Silverlight
- Once on the main menu, click the second to last tab named Bing Maps (V3).
- Now click on Connect to Bing Maps App.
- Internet explorer will launch and give you the option to capture in sets of 1, 2×2, 4×4, 5×5, 8×8, or 10×10 tiles. The more tiles you select, the more detail the final background raster image will have.
- Once you have selected which capture tiles you want. Click on Capture Screen.
Terra Server USA no longer exists, however, we have the 8m images on our server.
On a Windows machine, in snapView, go to the
Raster toolbox
>
Configuration
>
Internet
>
URL Terraserver
> and enter the following URL:
http://www.trackair.com/terra/tiles.php
MIDAS Related
A standard 5 Camera MIDAS runs at 22-30 VDC, 18-22 AMPS. The aircraft power supply must be able to supply a minimum of 30 AMPS and should have a breaker installed greater than 35 AMPs.
- You can use our provided laptop to connect an Ethernet cable to the MIDAS. You can then use the VNC viewer (in the tools folder on the desktop) to connect to the system remotely and view it from there until an RMA can be done.
- OR
- You can use your own laptop by configuring the IP and Subnet on your laptop’s Ethernet adapter to be IP: 192.168.0.39, Sub:255.255.255.0. You should then be able to remote access the screen using NVC at 192.168.0.202.
SnapPLAN
If you have issues with SnapBase Drag-and-Drop or Searching Street Address:
In order to have this working with Windows 10 it is required to switch off the Windows User Account Control (UAC). This will put your computer into vulnerable state and you should switch UAC on again when SnapBase Drag-and-Drop or Searching Street Address operation is finished.
- Download the following file: Download
- Choose a save destination and click
Save. - Extract the folder ‘UAC on-off’to the Desktop or an easily detectable location on your PC. Inside that folder you will find two files to switch UAC off and on again.
- Double-click one of these files.
- Agree to all questions.
- Restart your computer.
SnapSHOT
The SteadyTrack mount follows the guidance of the IMU. Depending on the weight of the sensor and the center of gravity the mount, it may under-correct, not follow the IMU fast enough for optimal accuracy , or over-correct, shoot past the value given by the IMU and then correct back to its proper point, possibly causing an oscillation within the mount movement . Therfore the user may adjust the speed of the mount to deliver the best possible accuracy. The user may adjust the SteadyTrack Mount speed following the steps below:
- In snapshot, connect all devices using GPS button.
- Wait one minute for all mount values to be loaded.
- In snapshot, look at the top menu, go to
10-equipment>18-SteadyTrack. - Select the
Mount Speedtab. - Click on the axis you wish to adjust under the
Fastcolumn. - The value being adjusted will be highlighted in yellow.
- Use the bar on the right to make the mount faster if the mount tends to under-correct and slower if the mount tends to over-correct, especially in turbulence.
- We suggest added or subtracting a value of 2 depending on the circumstance.
- Press the
Send these changes to mountbutton. - At this time you can observe the mount while online.
- If you would like these settings to be permanent, then press
the
Save These Changesbutton.
The SteadyTrack Mount can be limited in any axis and in any direction so that the sensors attached to the mount do not capture the fuselage cut-off. The user may adjust these limits as follows:
- In snapshot, connect all devices using GPS button.
- Wait one minute for all mount values to be loaded.
- In snapshot, look at the top menu, go to
10-Equipment>18-SteadyTrack. - Select the
Configuration Tab.
OPTIONAL: The user may wish to find
what values they would like to use (ie test for cut-off). This
can be done on the ground rather than during flight. The user
can enter values into the
Manually Move Mount
section. For example, to test the Left Side of the hole, Move
mount +9 Roll. Once the values are entered, Press the
Take Control
button to move the mount to that position. Open up aperture,
etc. of the camera settings and take a manual shot and view
image to see if cut-off still exists. Once done press the
release control
button. Towards middle bottom look at
Calibrate User Mount Limits
section. Enter the desired values. Hit
Set these limits
. Finally, reboot the entire system and check that values are
correct.
Repair a corrupted database:
- Open snapBASE.
- In the Main Menu go to
Database Maintenance. - Select the
Maintenancetab. - Create a backup of the corrupted database.
- Press
Repair Databasebutton. - Close and reopen the program.
If this does not resolve the issue:
- Go to
Database Maintenance. - Select the
Change databasetab. - Near the bottom, type in a new database name eg.
Tracker2and click theaddbutton. - When it asks if you want to transfer the camera data answer
YES. - Apply and close. Close and reopen snapBASE.
- Select
3) Import or update projectson the main menu. - Select
Locate files to Importand go toC:\Tracker\MDBand select the original corrupt database. Importing data from a corrupt database can sometimes resolve the issue.
If the database is STILL corrupt you will need to revert to a previous backup of the database before the corruption occurred. Data that was created after this date will have to be recreated, unless you had exported the flight plans prior to the corruption and you can re-import them after the following steps.
- You will have backup files in either:
C:\Tracker\MDB\USERBACKorC:\Tracker\MDB\dbbackupor- Wherever you normally keep your backup files.
- You will need to copy this file and put it in your
C:\Tracker\MDB\folder and change the extension to.mdb. You can also change the name as well if you wish. - Open snapBASE.
- Go to
Database Maintenance. - Select the
Change databasetab. - Select the new database and click apply. Your backup is now your primary database.
Are you having trouble with GPS connectivity with NanoTrack? Sometimes GPS receivers can loose their settings. There are various settings like COM port, parity and baud rate which have to be correct in order for communication to occur. This new feature automatically scans all possible settings to determine the correct values for you.
The NanoTrack and the GPS MUST be connected in order to perform the steps below.
- Open snapSHOT.
- Go to the toolbar option called
10. Equipment. - Select the
9. Special Equipment. - Click on the
16. NanoTrack. This is option opens the NanoTrack Configuration. - Open the
Fix GPStab. - Click on the
Reprogram GPSoption to start the GPS setup.
Data acquisition is of extreme importance in the aerial survey industry. As you photograph the world, Track’Air wants to ensure that your data is organized and you don’t run into limitations on the amount of info you are able store. This is why we have added the ability to change the database being used so that you may have more capacity and will be able to organize your project database by location.
Note: If you flight plans are big, we recommend splitting projects by region.
- Set the current data in the SnapBASE Main Menu in option
7)
                                        Database maintenance
. - Select the
Change Database tab. - Type in a desired name at the bottom, in the
Create a New Empty Databasesection.(e.g. NY_county1, NY_county2, etc.)
- Click
addto create it and make that the current database. The database is no longer locked into being titledTRACKER.MDB.
FAA information for the United States can now be embedded into flight plans. This feature can be accessed through SnapPLAN, SnapPLOT and SnapSHOT. The data is updated monthly and can be downloaded via SnapPLAN or SnapSHOT.
For a manual download of the file, click here: https://www.trackair.com/airspaces/AirSpaces.MDB
If you do not want the airspace division lines to show in your
project, simply go to the toolbar and select option
2- Hide
option and click on
Hide airspace
.
Airspace surrounding the current project can also be viewed in a
list format which allows you to highlight the ones which are of
most importance to the project. Go to the toolbar and select
5-Tools
, then click on option
18- Show airspace form
. This airspace form is available only on SnapSHOT and SnapPLAN.
FAA data is
updated once a month, so make sure you download the latest data
from our servers by going to the Config menu on the Airspaces
form and clicking
Download Latest
FAA
Airspace Data.
To use in flight, in snapPLAN export the plan and check include airspaces to use FAA-Airspaces in Snapshot.
Note: This applies to US airspace only.
A ground test sends a fake GPS signal to the MIDAS to force the cameras to fire as they would in flight. To run a ground test do the following:
- In Snapshot load they flight plan and then go to
6-Tools>5-Troubleshooting>4-Make camera ground test. - Select last check box
Do not automatically start a
                                        photo run
. - Use the Simulator (bottom right corner) turn dial Up or down to change speed of aircraft.
- If the simulated aircraft is flying too fast, the cameras will not be able to keep up.
- If you like, select button 10 on Right side of screen, this will auto select line after line.
- Select a line and let system fire as many shots as you feel comfortable.
- If button 10 was used, be mindful of how many triggers you are applying to the camera.
No more than 2000 shots is recommended.
Please refer to the following manual and video to begin using the PSU Spot Shot feature:
Pilot screens give our flight management systems a great advantage, allowing quick changes and real time feedback. However due to the size of the screens it can be a bit difficult to edit settings specially if you’ve lost your stylus and the engine is running.
We want to provide our clients with the best experience so our, software engineers went window by window and maximized the size of each to ease user interaction. As you can see below, size has been maximized and should more easily be triggered by touch.
Before use with the MIDAS you need to set up your new POS as follows:
- Start the POS AV (press and hold the Start button for a few seconds).
- Start the POS AV Controller program on the MIDAS Pilot Display.
- Press the
Connectbutton. - Go to
Menu>Settings>Input/Output Ports>Serial/Analog - Go to the
COM1tab and EnableCOM1, set the Baud rate at 115200, no Parity, 8 data bits, 1 stop bit, update rate 5Hz. - Message select (only):
$INVTG, $INGGA, $INZDA. - Press Apply and the window.
- Go to
Menu>Settings>Save Settings. A window with a blue progress bar should appear, confirming the settings have been saved. - Warning: Make sure Logging is OFF before saving the setting.
- Press the
Disconnectbutton. - Now cycle power the POS AV and check if the settings you just made are still there.